|
|||
|
|
|
|
| TALLER DE INICIACIÓN A LAS TÉCNICAS DE GRABADO Septiembre - Noviembre 2017 Imprenta Municipal Artes del Libro, Madrid |
|||
|---|---|---|---|
 |
|||
| TALLER GRABADO 20.09.2017-21.09.2017 Imprenta Municipal Artes del Libro, Madrid |
|||
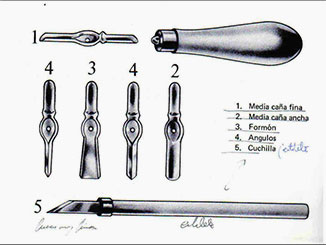
| [ES] Taller de Xilografía: Grabado en madera y técnicas afines El grabado al linóleo. o linograbado, es una variante de la xilografía, en la cuál se sustituye la plancha de madera por una de linóleo. Es un material blando y de densidad uniforme, que permite ser tallado en todas direcciones, por lo que se pueden conseguir detalles muy finos. Las herramientas usadas en la linoleografía son las mismas que se utilizan para la xilografía a fibra: cuchillas y gubias. Al ser un material muy cómodo de trabajar, la talla debe realizarse con precaución para no vaciar en exceso la plancha, pues los errores son difíciles de rectificar. |
[ENG] Xylography Workshop: woodcut and related techniques Linoleum engraving, or linocut, is a variant of the woodcut, in which the wooden board is replaced by a linoleum. It is a soft material with a uniform density, which can be carved in all directions, so very fine details can be reached. The tools used in linoleography are the same as those used for fiber woodcut: blades and gouges. As it is a very comfortable material to work with, the size must be carried out with caution so as not to overfill the plate, since errors are difficult to rectify. |
||
 |
|||
[ES] Sobre la plancha se realiza el dibujo a lápiz o se traslada con un calco el modelo que se desea estampar. Es importante darse cuenta que el grabado saldrá invertido, por eso se debe pasar a la plancha con el calco invertido. |
[ENG] The image is drawn with a pencil on the engraving plate or the model to be stamped. It is important to realize that the engraving will be inverted, that is why it should transferred to the plate as an inverted copy. |
||
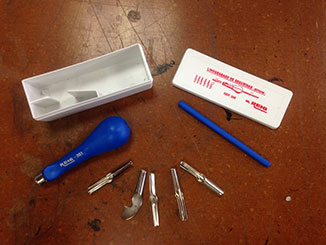 |
Emptying of surface The gouge is a cutting instrument, so the good placement of the hands is essential. Care must be taken to always place the hand to the side or behind, holding the linoleum, -never in front-, thus avoiding possible cuts The use tof he blade attacking perpendicularly the linoleum on either side of the drawing, holding the blade with the right and the plate with the left rotating at all times to get the most correct position. Once the drawing is outlined, proceed to remove with another type of gouge the parts that were white, this way emptying the linoleum through successive cuts in the form of curved, wavy, broken lines; It is posible to attack the linoleum directly with the V-shaped gouge and cut the contour of the image, the cuts of this gouge are angular, deep, narrow and V-shaped. The gouge makes rounded cuts |
||
| Vaciado de superficie La gubia es un instrumento cortante, por lo que la buena colocación de las manos es imprescindible. Se tendrá la precaución de situar la mano siempre al lado o detrás, sujetando el linóleo, -nunca delante-, así se evitarán posibles cortes. Utilización de la cuchilla atacando perpendicularmente el linóleo a uno y otro lado del dibujo, sujetando la cuchilla con la derecha y la plancha con la izquierda pudiéndola girar en todo momento para obtener la posición más correcta. Una vez contorneado el dibujo se procede a sacar con otro tipo de gubia las partes que resultaran blancas, y así vaciar el linóleo mediante sucesivos cortes en forma de líneas curvas, onduladas, quebradas; punteando o desprendiendo una amplia zona,que deberán ser más profundas para evitar que se manchen de tinta. Se puede atacar el linóleo directamente con la gubia en forma de V y cortar el contorno de la imagen, los cortes de esta gubia son angulosos, profundos, estrechos y tienen forma de V. La gubia hace cortes redondeados. |
 |
||
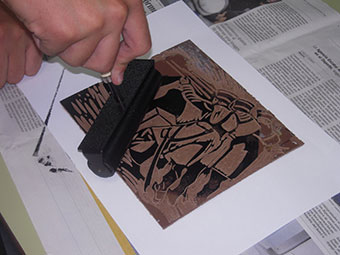
| Entintado Seguidamente sobre la plancha o matriz tallada se le aplica tinta con un rodillo de caucho, se puede utilizar tinta de imprenta u óleo. La tinta se extiende previamente sobre un cristal o acetato. El rodillo no debe estar cargado de mucha tinta, para ello podemos descargarlo en alguna zona limpia de cristal. También debemos batir bien la tinta sobre el cristal para conseguir uniformidad y eliminar posibles grumos, etc. |
Inking Next, on the carved plate or matrix, ink is applied with a rubber roller, printing ink or oil can be used. The ink is pre-spread on a glass or acetate. The roller should not be loaded with much ink, so it can be downloaded in a clean area of glass. The ink must also be beaten well on the glass to achieve uniformity and eliminate possible lumps, etc. |
||
|
|
||
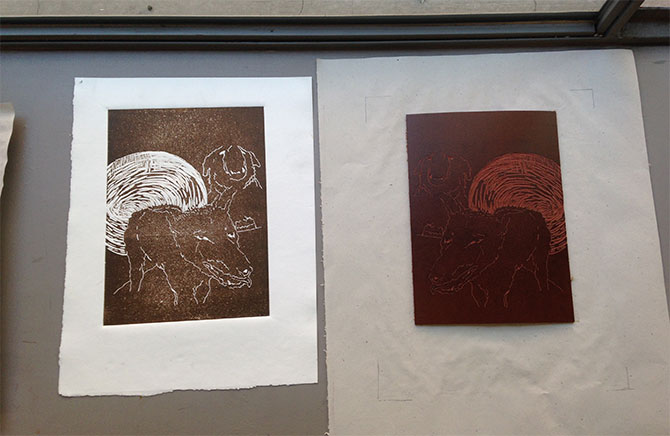
Estampación A continuación se levanta el papel, habiéndose realizado la primera estampación. |
Printing |
||
 |
|||
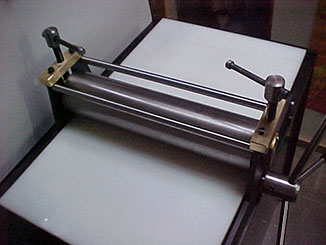
Volviendo a repetir todo el proceso se saca sucesivas copias. Hay que tener en cuenta ,que la zona que se haya vaciado con la gubia, saldrá sin tinta y la zona que se deje sin grabar saldrá entintada. a hoja de papel b plancha c papel que se imprimirá d fieltros |
Repeating the whole process copies can be made. It must be taken into account, that the area that has been emptied with the gouge, will come out without ink and the area that is left uncarved will come out inked. a sheet of paper b plate c paper to be printed d felt |
||
 |
|||
| TALLER GRABADO 21.11.2017-22.11.2017 Imprenta Municipal Artes del Libro, Madrid |
|||
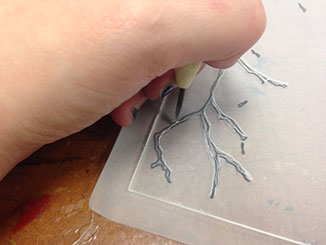
| Punta seca La expresión punta seca, describe la técnica de rayar o rozar directamente la superficie pulida de una plancha de metal con una punta aguzada, de ahí que la punta seca, esté considerada como una técnica directa de grabado en hueco. La característica principal de la punta seca es la rebaba que levanta la punta al incidir sobre una superficie resistente del metal, siendo esta rebaba la encargada de retener casi toda la tinta en el proceso de entintado y estampación. |
Drypoint engraving rotogravure The term dry point, describes the technique of scratching or rubbing directly the polished surface of a metal plate with a sharp point, this is why the dry point, is considered a direct technique of intaglio engraving. The main characteristic of the drypoint engraving is the burr that raises the point when scraping on the resistant surface of the metal, being responsible this burr for retaining almost all the ink in the process of inking and printing. |
||
El grabado a punta seca es una técnica de grabado artistico en hueco consistente en grabar directamente sobre la plancha de grabado haciendo a mano libre pequeñas incisiones y líneas con un instrumento de punta fina muy afilada. |
The rotogravure is a artistic drypoint engraving technique consisting of engraving directly on the plate making small incisions and lines by hand with a very sharp fine-tipped instrument. |
||
 |
 |
||
 |
|||
| *Las primeras estampaciones suelen ser pruebas de estado (P/E) para realizar posibles rectificaciones de grabado, entintado o grado de presión. Luego se procede a obtener las pruebas de artista (P/A, 10% de la tirada), y por último se comienza propiamente la tirada. *The first prints are usually state tests (P/E) to make possible rectifications of engraving, inking or degree of pressure. Then we proceed to obtain the artist's proofs (P / A, 10% of the print run), and finally the print run begins properly. |
|||
|
|||
|
|||